Table of contents
What is a Salesforce lead process?
Your sales team’s time is valuable. What if they could spend more of it connecting with prospects and closing deals, and less time trying to wrangle leads in Salesforce?
When you create Salesforce lead processes, your team can:
Keep high-quality leads from slipping through the cracks
Stop wasting time manually assigning leads in Salesforce
Create a better experience for potential customers
Meet with qualified prospects ASAP (before the competition!)
Speed up your entire sales cycle to close more deals, faster
In this guide, you’ll learn the ins and outs of Salesforce lead processes, including how to build a lead process using Salesforce’s native lead management features. We’ll also explore how Calendly can help your team automate your lead processes to work more efficiently and hit your goals faster.
Understanding lead processes
Before we dive into how to build a lead process, let’s review some terminology.
In Salesforce, prospects start off as leads, then become contacts attached to accounts and opportunities.
Lead processes dictate what happens to those leads when they first enter your Salesforce instance. These processes include lead routing, lead distribution, or lead assignment — aka matching leads with the right rep or queue. (You'll often hear people use lead routing, distribution, and assignment interchangeably.)
What is a lead in Salesforce?
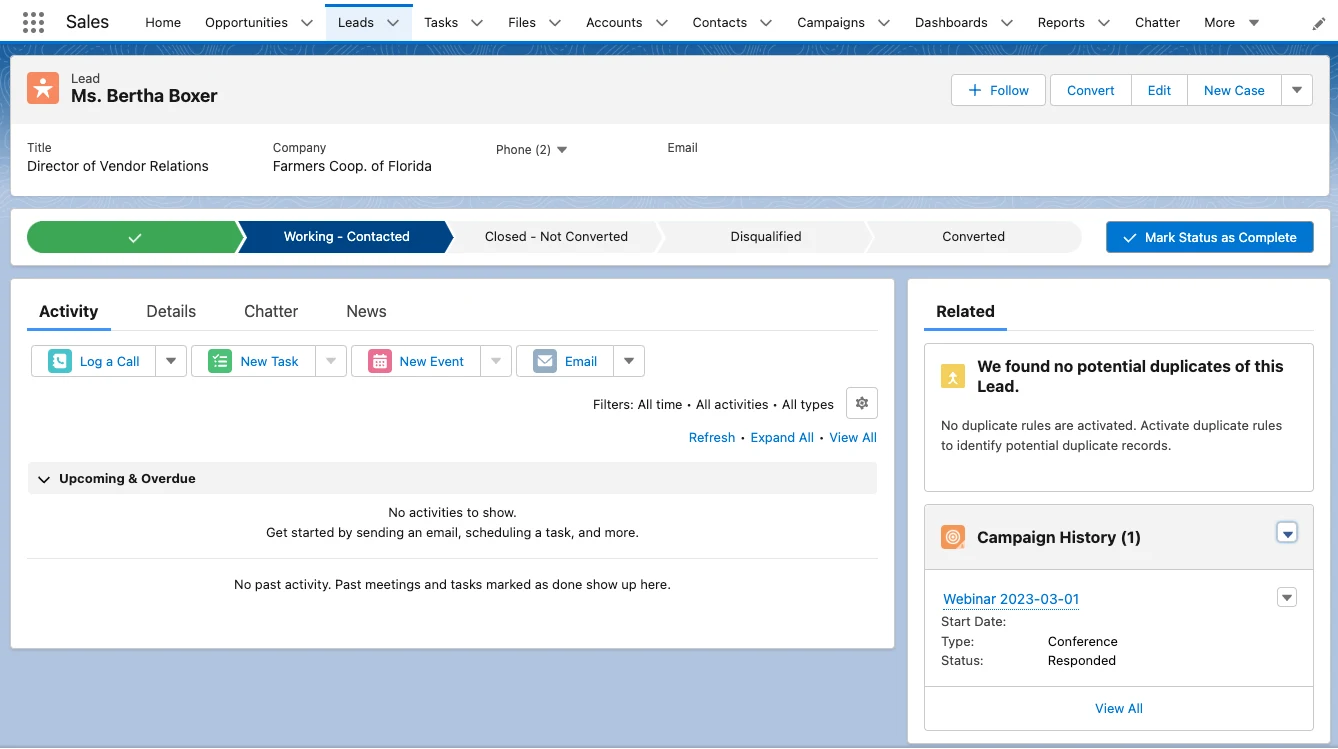
A lead in Salesforce is the default object created when someone has shared their contact info with your company, but who hasn’t gone through the lead qualification process yet. Salesforce leads are often top-of-funnel or cold leads, so “lead conversion” refers to a sales rep qualifying a lead, not closing a deal.
Salesforce lead objects contain:
Name
Contact information
Job title and company
Lead source (website forms, events, social media, paid ads, referrals, etc.)
An activity log showing interactions (calls, meetings, emails) between the sales team and the lead
Campaign history showing which marketing campaigns the lead has interacted with
Sales path, the progress bar that shows where a lead is in the sales pipeline. Default lead statuses include Open, Working - Contacted, Closed - Converted, and Closed - Not Converted.
Any custom fields your team decides to add!
When a sales rep qualifies a lead, the lead converts to a contact, which creates an opportunity. (A contact is an individual person. Opportunities are deals in progress.)
Salesforce lead process example
Here’s what a basic Salesforce lead process looks like in action:
A website visitor named Nora fills out a contact form to learn more about your product. She shares her name, email address, company name (Acme Inc.), and company size. You use Salesforce’s built-in web-to-lead forms, so Nora’s form submission automatically creates a lead record.
Your team has set up lead assignment rules that assign leads to sales reps based on their company size. Acme Inc. has 5,000 employees, so Nora is automatically assigned to Taylor, your top enterprise sales rep.
Acme Inc. is in your target market, so Taylor emails Nora to set up a qualification call. Taylor changes Nora’s lead status to “Working - Contacted.”
Nora agrees to meet with Taylor, and after some email back-and-forth, they find a time that works.
During the qualification call, Taylor decides Nora is a qualified lead! Taylor converts Nora’s lead in Salesforce, which creates a new contact (Nora) and opportunity, and account (Acme Inc.). This action automatically closes the lead record.
This is just one example of a straightforward, mostly manual lead process in Salesforce.
One of the most helpful — and sometimes overwhelming — parts of Salesforce is how many things (fields, layouts, rules) you can customize to fit your team’s processes and needs. The options can seem endless!
To help you get started, let’s walk through three best practices for setting up a lead process using Salesforce’s built-in lead management features.
Qualify, route, and book sales meetings instantly
How to set up a lead process in Salesforce: 3 best practices
1. Customize fields and page layouts to reflect your sales process
You can tailor your Salesforce setup to match your team's workflows by configuring custom fields and page layouts.
Custom fields: Create custom fields for the info your business needs to collect about each lead. For example, let’s say your company offers several different products. You want to track which product each lead has expressed interest in, so you create a custom field called “Product,” with a picklist value for each product you offer.
When a lead fills out a marketing form to learn more about your company, the lead selects the product they’re interested in from a dropdown, and that info gets added to their lead record in Salesforce. This custom field helps you:
Match leads with the sales rep most knowledgeable about the product
Tailor your sales approach
When you create custom fields, make sure you map them to contact, account, and opportunity records, so you don’t lose valuable info when you convert leads.
Page layouts: Customize the page layouts in Salesforce to match your sales process and the information you need at each stage. For example, you can create a page layout called "Qualification" with fields for capturing key qualification criteria such as budget, timeline, and decision-making authority. This template makes it easy for your team to see relevant details at a glance before hopping on a call with a lead.
Customizing these elements helps you track the most important info about every lead throughout the lead process.
2. Set up lead assignment rules
Manually assigning leads in Salesforce can be time-consuming, especially if you have a high volume of inbound leads. Automated lead assignment speeds up that task — and your entire sales cycle.
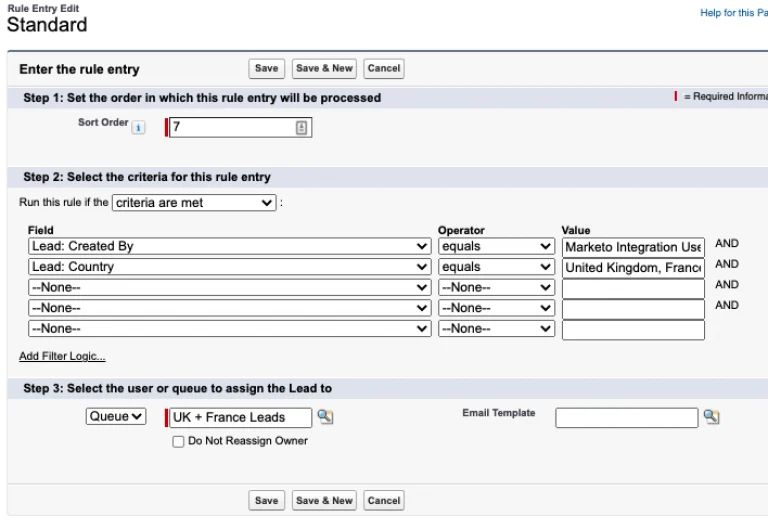
Lead assignment rules are a set of customizable criteria that determine which rep or queue is assigned each new lead. When leads are imported (from a spreadsheet or integration) or generated through your website forms, Salesforce goes through the rules in order until it finds one that matches the lead’s info, then routes the lead accordingly.
You can assign leads based on company size, the product the lead is interested in, geographic sales territory, lead source, or any other info in the lead record.
Lead queues are buckets for unassigned leads. You can choose which sales reps can pull leads from each queue. For example, if you have several reps covering the West Coast sales territory, you can create a West Coast lead queue and make each rep a member of the lead queue for their territory.
Hot tip
To make sure no leads get lost, you also need to set a default lead owner. If the assignment rules fail to locate an owner, or you don’t set up assignment rules, web-generated leads are assigned to the default lead owner.
You can customize assignment rules to fit your team's needs. Here are just a few examples of what Salesforce calls "simple rules" — rules that only use one criteria:
By country or state: Route leads from specific states or countries to sales representatives who understand the regional market. For example, if the state field equals Alaska, Arizona, California, Hawaii, Nevada, Oregon, or Washington, assign the lead to the West Coast queue.
By language: Assign leads to sales reps who speak the same language.
By industry: Assign leads from different industries to salespeople who have experience working with those sectors.
By company size: Assign leads based on the company size, assigning larger companies to a dedicated enterprise sales team.
You can also create “complex rules” using multiple criteria. For example, you could route leads from specific states to salespeople based on their sales territory and the company size. If your sales rep Bob works enterprise leads on the West Coast, your filter criteria could say: If the state/province equals Alaska, Arizona, California, Hawaii, Nevada, Oregon, or Washington, and the company size equals greater than 5,000, assign the lead to Bob.
3. Fuel your lead processes with high-quality data
High-quality data — data that’s accurate, reliable, consistent, and up-to-date — helps your team make informed decisions, target the right prospects, personalize lead nurturing, and boost conversion rates.
So, how do you make sure your Salesforce lead data is high quality?
Gather useful data via your marketing forms
Practice good data hygiene
1. Gather useful data via your marketing forms
Sales Cloud includes web-to-lead forms you can embed in your website using HTML. When someone fills out the form, Salesforce automatically creates a lead record.
Use these forms to collect important info about leads. You need more than a name and email address to put those new lead assignment rules into action! Plus, your sales reps need to understand a lead’s company size, industry, and pain points for lead qualification.
Asking all those questions up front would make for a pretty cumbersome form, and long-form answers are time-consuming for your team to read and analyze. Luckily, when you know what job titles, industries, and company sizes tend to make a good lead, you can use dropdown menus to collect that valuable info without overwhelming prospects.
2. Practice good data hygiene
Data hygiene refers to all of the ongoing processes involved in keeping data accurate and organized. Salesforce features like validation rules and duplicate management make data hygiene easier.
Validation rules let you set specific criteria for Salesforce data entry. For example, a phone number must have a certain number of digits, or the “company name” field can’t be blank.
Salesforce’s built-in duplicate management tools identify and manage duplicate records, helping to prevent doubled marketing efforts and consolidate lead data into a single source of truth. Automatically checking for duplicate records is especially useful when generating and importing leads from several sources.
“Data quality and hygiene in Salesforce are so important in keeping departments from becoming siloed. When you have clean, reliable data for multiple departments to use, it creates a source of truth and a sense of trust in the system.”
Riley Humes
Revenue Operations Manager at Calendly
What are the limitations of Salesforce’s built-in lead processes?
The built-in Salesforce lead management processes are a solid starting point, but there are a few things missing:
Built-in round robin distribution: Round robin lead distribution is the process of assigning leads to reps based on factors like team member availability or equal distribution for a balanced workload. Salesforce lead assignment rules don't include an easy way to set up round-robin distribution — you need an additional tool like Pardot, one of the round robin apps on AppExchange, complex Apex code, or a third-party lead routing platform.
Lead qualification features: Lead qualification and lead scoring ensure reps spend their time on high-quality prospects, not unqualified leads. Sales Cloud doesn’t include lead qualification or scoring. To add that functionality, you’ll need Marketing Cloud Account Engagement, which can be a pricey addition.
Sales call scheduling: Once a lead fills out your marketing forms, they expect to connect with a sales rep ASAP. But even with Salesforce’s automated lead assignment, reps still need to manually reach out to the lead to set up a meeting. That can result in a lengthy email back-and-forth — and any delay gives the prospect time to find a solution elsewhere.
If you’re only using Salesforce’s native capabilities, your sales team may still end up spending too much of their valuable time talking to unqualified leads or trying to find the right time for an initial sales call.
That’s where Calendly comes in.
Automate your lead processes with Calendly and Salesforce
Your scheduling automation platform can be an excellent lead generation, qualification, and management tool — especially when it integrates with Salesforce. Calendly’s Salesforce integration helps your team be more efficient and organized while creating a better experience for potential customers.
When a lead books a meeting via a sales rep or team’s Calendly booking page, Salesforce automatically creates a new lead, contact, or opportunity. If the lead already exists in your Salesforce instance, the event is added to their existing record.
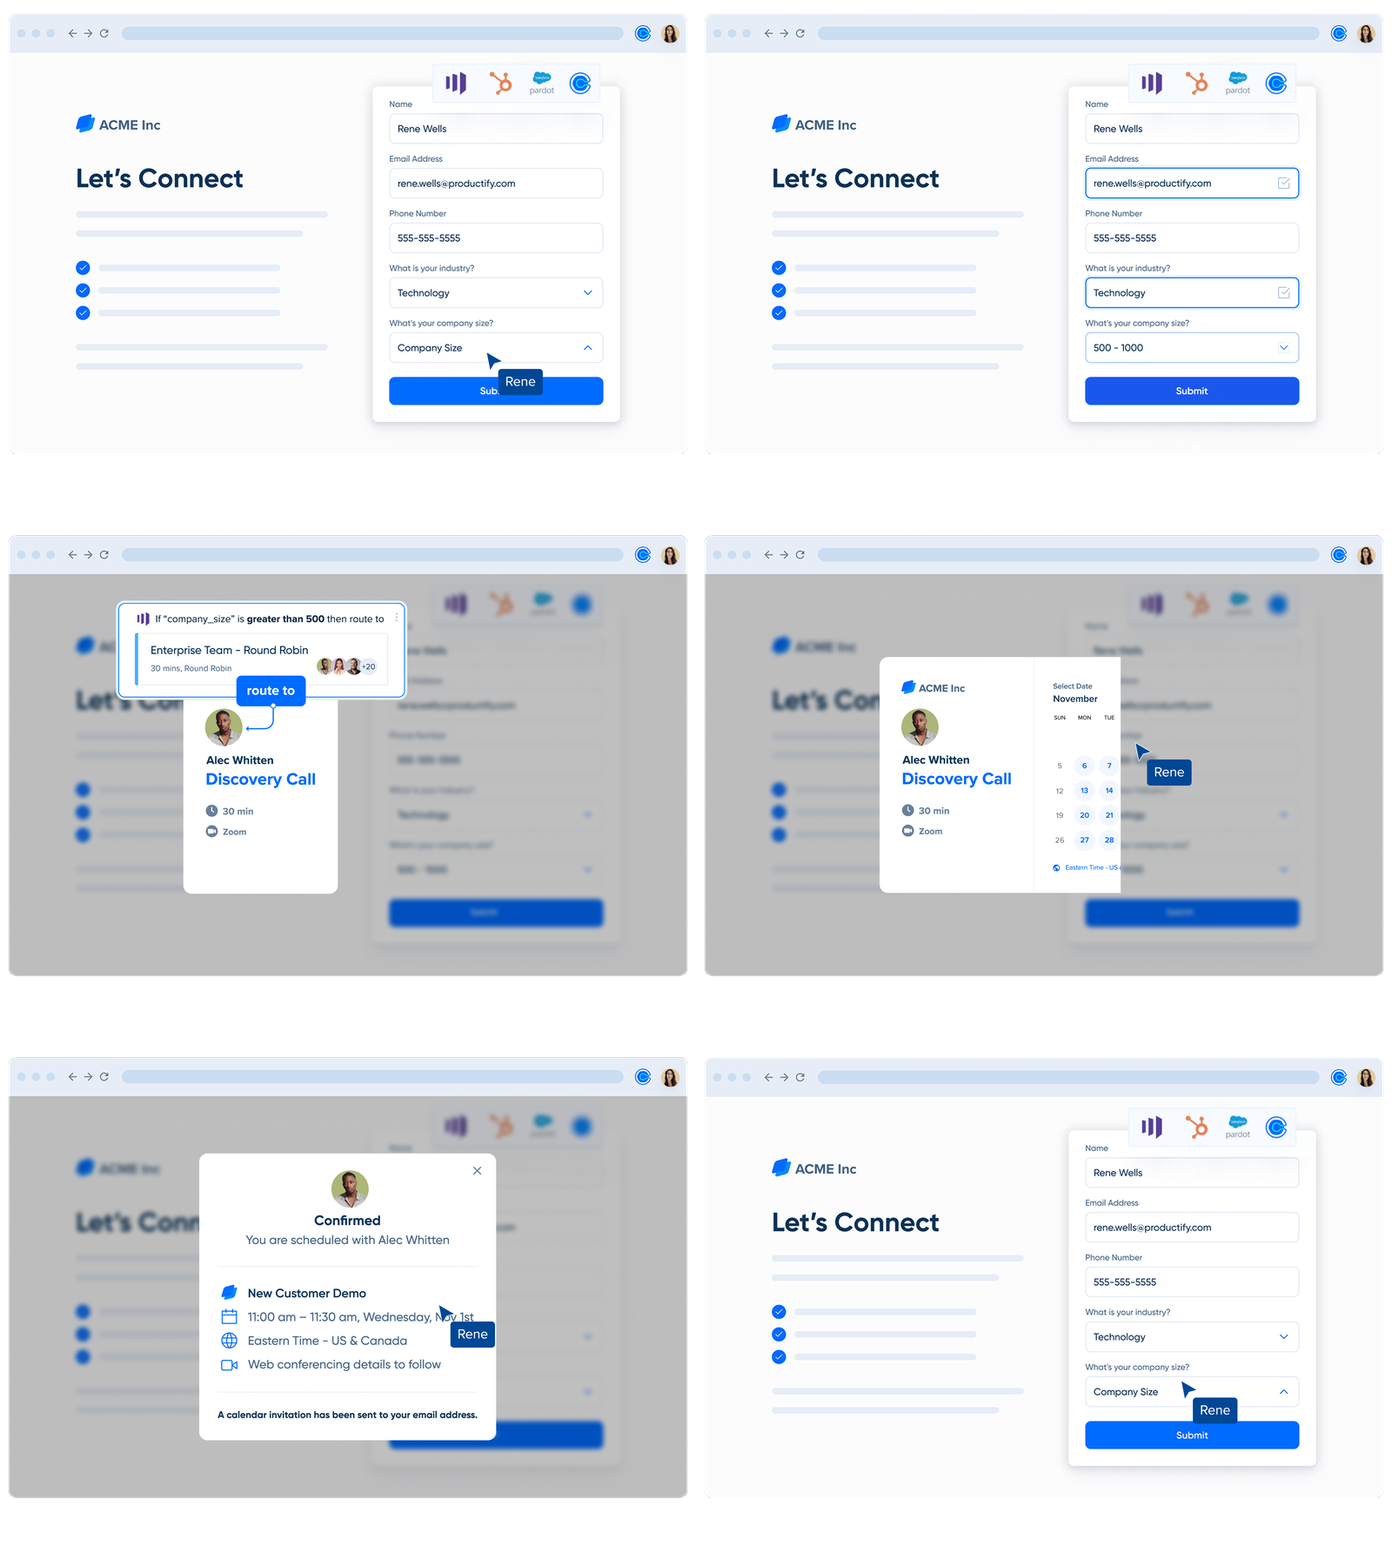
What if you don’t want to let just anyone book a meeting with your team? When you add Calendly Routing to your marketing forms, you can show scheduling pages only to leads who meet your qualifications, like prospects from specific industries or companies of a certain size. That way, your busy team can focus on the most valuable deals.
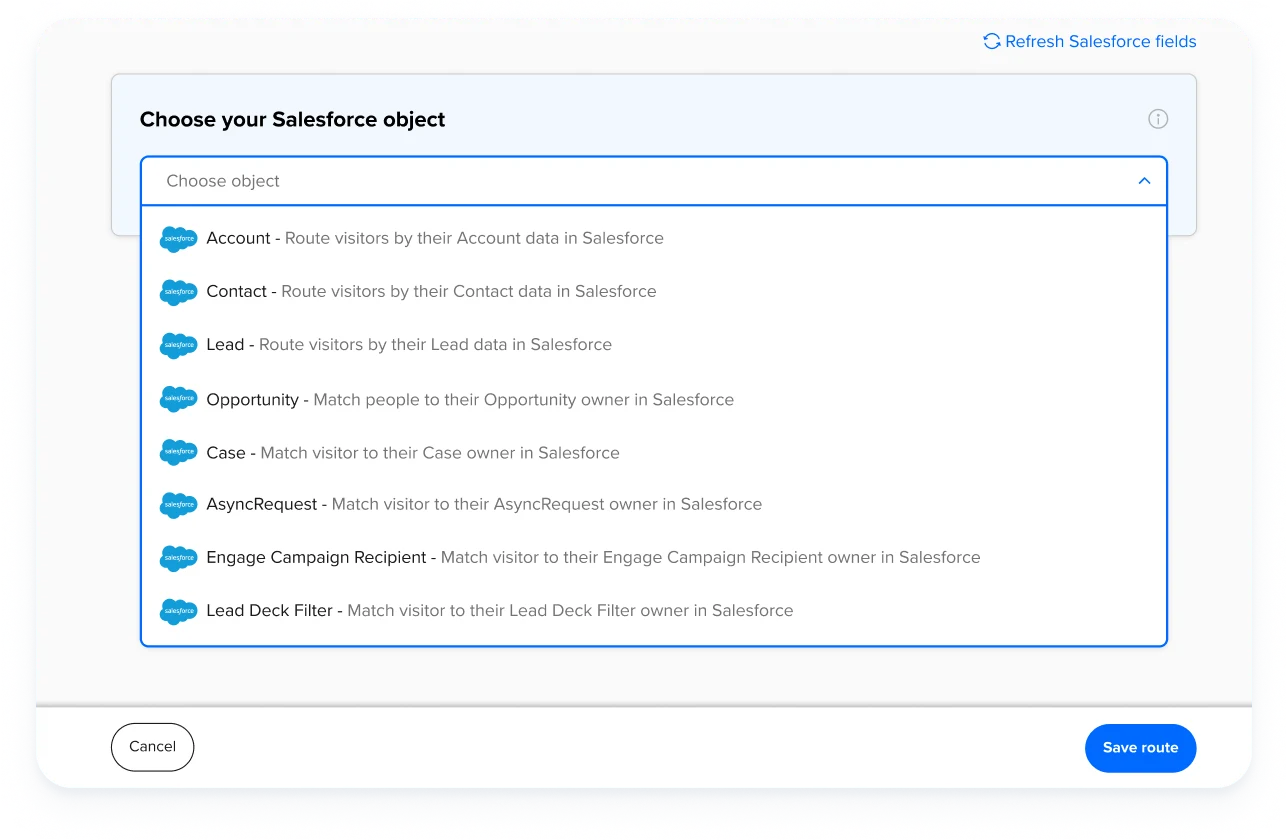
Calendly Routing works with HubSpot, Marketo, Pardot, and Calendly forms and is built for your Salesforce CRM. Real-time Salesforce lookups let you send known leads or customers from your website form directly to their account owner’s booking page, without any manual reassignment.
If you use a data enrichment tool like Clearbit with your HubSpot, Marketo, or Pardot forms, Calendly Routing will use the data from both hidden and visible form fields to qualify leads and determine which booking pages appear. That means you can gather all the data you need while keeping your forms short and easy.
Remember the lead process example we walked through earlier featuring Nora from Acme Inc.? Here's what that process looks like when you add Calendly:
Nora fills out your “contact sales” form, which is already built in HubSpot, connected to Calendly Routing, and enriched with Clearbit.
She enters her email address in the form, and Clearbit fills in the company name, size, and industry. This shortens the form, so Nora only has to input her name and job title.
Calendly uses the Salesforce lookup to see if Acme Inc. has an account in your Salesforce instance. They don’t, so the next step is lead qualification.
Based on Nora’s information — company size, industry, job title — she’s a highly qualified lead, so she’s automatically routed to the booking page for your enterprise sales team.
Nora is happy about that, and immediately books a meeting time that works for her, with the exact team she needs to talk to.
On the backend, Calendly’s Round Robin meeting distribution is set to optimize for availability, so it assigns the meeting to the first available sales rep — in this case, Taylor.
Calendly instantly creates a lead record in Salesforce with the info Nora entered into your website form (including the data from Clearbit) and an activity log of any meetings she books with your team via Calendly. Salesforce automatically makes Taylor the lead owner.
If you were solely relying on Salesforce’s built-in lead features, Nora’s lead record would have gone to an enterprise sales queue, and she would have had to wait for a rep to manually pick up the lead and reach out to her to book a meeting. Adding Calendly, HubSpot, and Clearbit to your lead processes saves Taylor time, creates a better experience for Nora, and increases the likelihood Nora will purchase from your company over a competitor.
Lead routing has been a game changer for RCReports, a compensation analysis solution for accountants and business valuators. Before connecting Calendly Routing with their Salesforce instance, RCReports AEs spent at least five hours a month reassigning leads booked on the wrong calendar. This created a clunky customer experience and frustration for the sales and marketing teams.
“Now that we’ve implemented Calendly’s routing feature with Salesforce integration, demos are always booked with the correct AE, reducing friction for both our team and the customer.”
Abbie Deaver
Director of Marketing at RCReports
Users on Calendly’s Teams plan and above can connect Calendly to Salesforce. The full suite of Salesforce routing features, including routing by Salesforce ownership, is available on Calendly’s Enterprise plan.
To learn more about Calendly Routing, get in touch with our sales team.
Match leads with the right reps and close deals faster
Picture this: You build out your Salesforce lead processes, and leads stop slipping through the cracks. The team saves a ton of time on admin tasks like manual lead assignment and scheduling, so you’re more productive than ever. You can prioritize the most valuable leads and spend more time connecting with prospects. You follow up with leads quickly and meet with them as soon as they’re ready.
You’ve created a faster sales cycle and happier customers — and your sales team hits their numbers. That’s a win for everyone.
Get started with Calendly
Rachel Burns
Rachel is a Content Marketing Manager at Calendly. When she’s not writing, you can find her rescuing dogs, baking something, or extolling the virtue of the Oxford comma.
Related Articles
Don't leave your prospects, customers, and candidates waiting
Calendly eliminates the scheduling back and forth and helps you hit goals faster. Get started in seconds.
Calendly eliminates the scheduling back and forth and helps you hit goals faster. Get started in seconds.

